Managing the Subscription data refers to the monthly management of the data provided by the Operators about their subscriptions. This a key part of the Lifetime Analytics administration.
The Subscription data management includes:
the monthly import of subscriptions data (Snapshot) collected by the Operator (Data Files)
the monthly launch of the churn/cross-sell/up-sell cluster automated analysis
Managing the Subscription data is deeply linked to the configuration of Data Reference, RGU Reference and Product Family Reference (See Admin Reference). Be sure to have a consistent configuration before using Data management functions.
The data management functions are available only to the users having the permission admin:data-management, inside the Main Menu > Settings (Gear icon) or more settings.
Snapshot management
The Snapshot management is available into the Data Management > Snapshots.
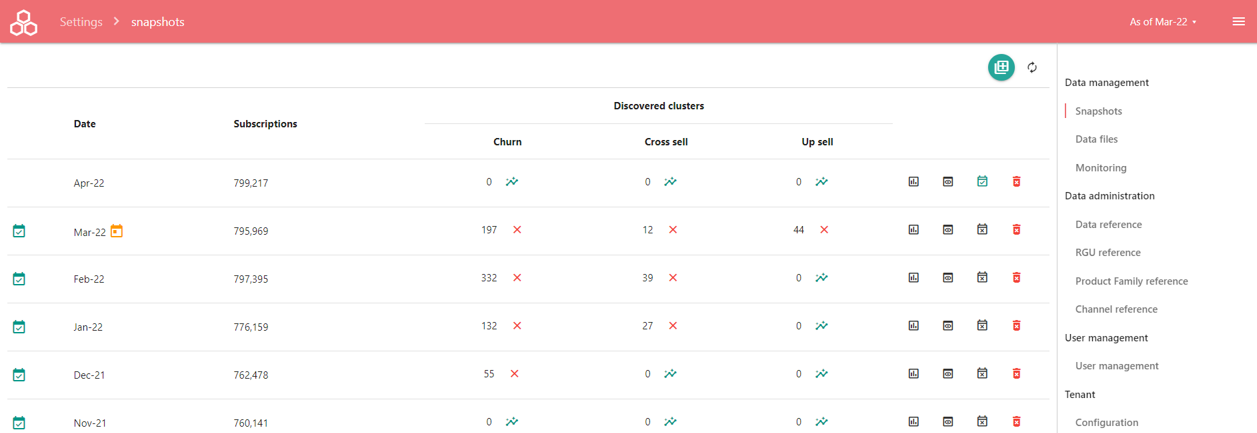
The Snapshot Management screen displays the list of imported Snapshots, as a monthly pictures of the Subscription data (cf Admin Reference), with :
Calendar Open icon : the icon defines if the snapshot is available to the users of the application in the Snapshot calendar selection (see header).
Date : the related month of the subscription snapshot
Subscriptions : the number of subscriptions
Discovered clusters : numbers of clusters per type - churn clusters, cross-sell clusters and up-sell clusters
The Make insights button allows to launch the automated discovery of the related cluster type
The Clear button removes the previous discovered clusters. It allows then to launch a (re)computation of the clusters
Analytics button opens the Snapshot Overview, providing a deeper understand of the imported data (see Snapshot Overview below)
Preview button allows to preview the selected snapshot, before opening it to all the users. It selects the selected snapshot as the current snapshot of the application
Open/Close button allows to open/close the snapshot for all the users : Each snapshot as a monthly picture of the data can be open or closed to the application's users. It defines the visibility of the snapshot to the other users. When clicking to the Preview button, the whole application is displayed with the selected snapshot date. It allows to preview the data before opening it the other users.
Delete button : while clicking and confirming the deletion, it removes completely from the application the subscription data, churn clusters and churn clusters analysis for the given snapshot.
Import Subscriptions from Data files
Pressing the Add to queue button (icon top panel) , it allows the setup the import, check and interpretation of the Data File regarding the Data Reference (data model), following the steps:
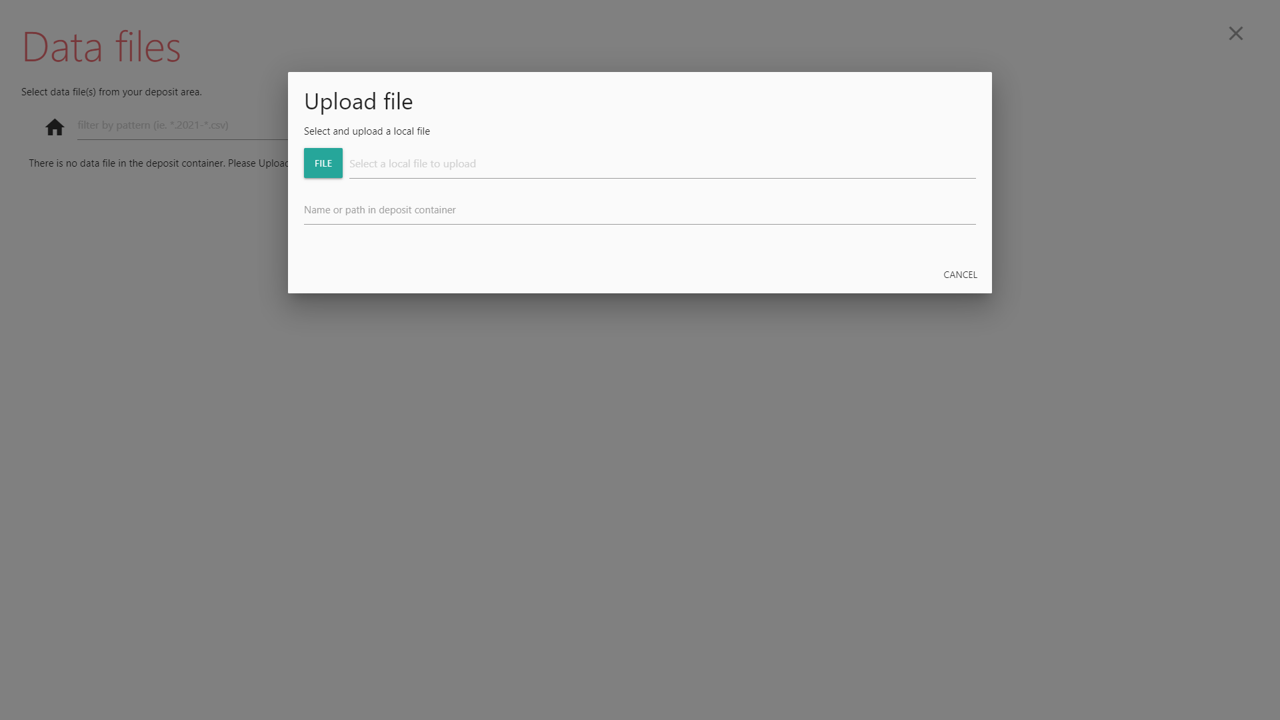
1) Select the data file or data files (using a glob pattern), from the deposed Data Files, while clicking on the Add to Queue icon button
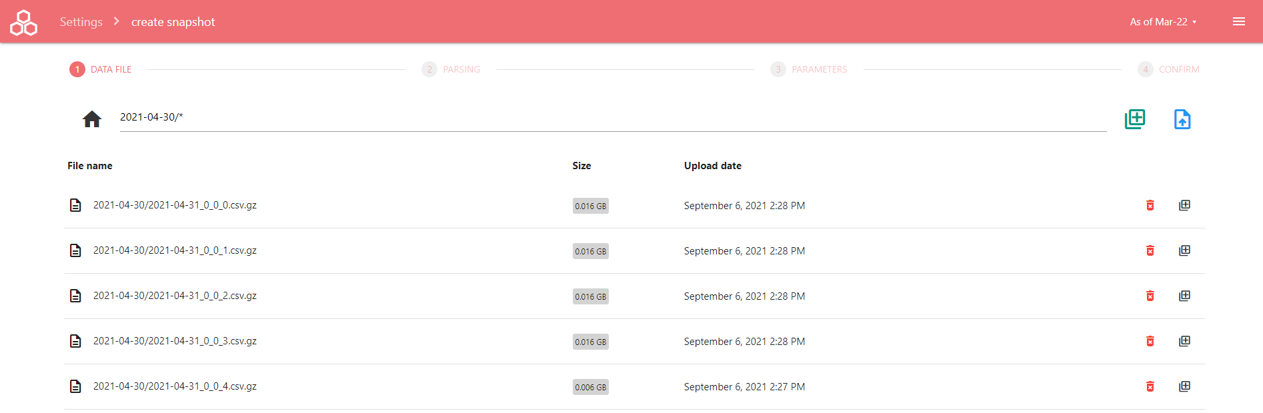
While pressing the Upload button, it allows to upload a data files, containing the subscription data, into Lifetime Analytics (see Data Files below).
2) Define how to parse the data file
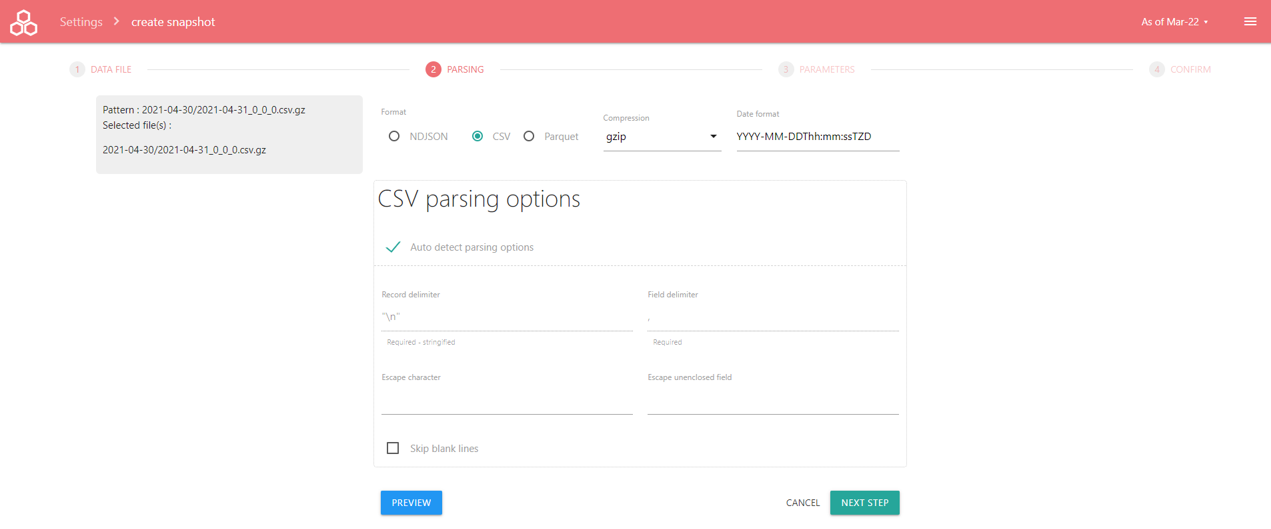
On the left panel, the selected data files are listed.
On the main panel, you define the settings to parse the data file, accordingly on how the Operator build the subscription data files :
Format : data file format, supported only for CSV, NDJSON and Parquet formats
Compression : None (blank) or GZIP or ZIP file compression. Note ZIP does not allow multiple file archive. Only one single file per ZIP file. Use pattern for multiple data files selection
Standard date format representation : the application attempts to find automatically the corresponding date format. Please prefer ISO format.
Parsing options, depending of the file format
CSV : Auto detect parsing options infers from the data files the parsing options for the top 1000 first lines. Filling the settings overrides the parsing options
The Preview button display the top 100 lines of the data files
Click the Next button to move to the next step
3) Define the Snapshot settings
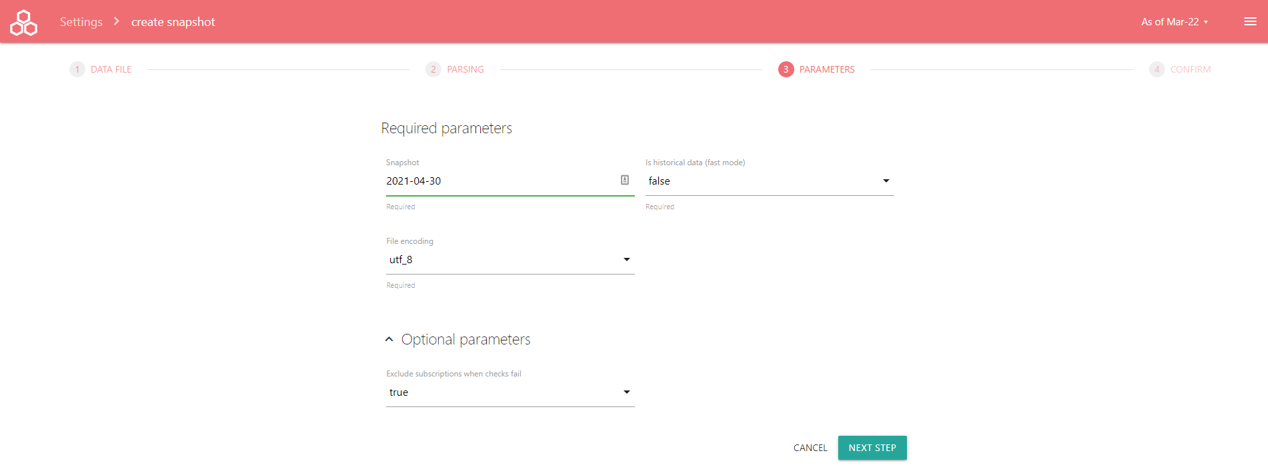
Define here the settings of the Snapshot to create :
Snapshot : it is the date (end of month only) of the Snapshots, as the the picture date for the subscriptions. It is a key settings for the application. Please define or review it carefully.
Is historical data (fast mode) : Set to true, if you want import only the historical data for churn/up-sell/cross-sell dynamics. Historical data are not processed for cluster discovery.
Exclude subscriptions when checks fail : Set to true, to continue to import of the subscription data even if one or many data check fail for a subscription. Subscription with data check failure are ignored. Set to false, if you want to reject all the subscription data if one or many data check fail. See Monitoring (below) to see details about data check failures.
Click the Next button to move to the next step
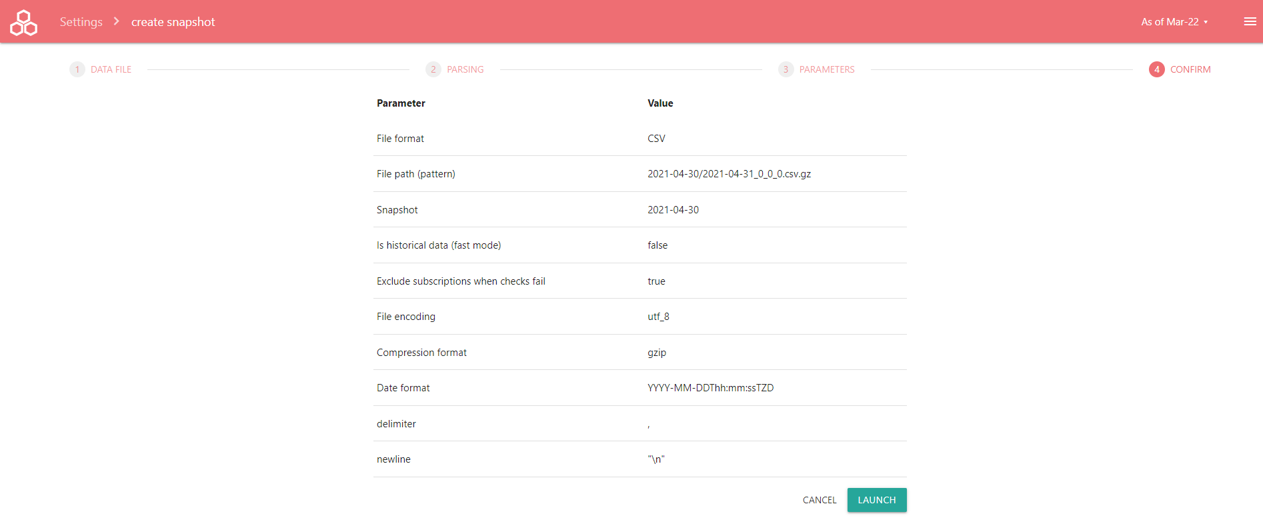
4) Review and confirm the launch of the Subscription data import
Upload Data files
Click on the Upload button to upload a data file into the application.
The upload (manual through the application or automated) requires to have special permission and the client IP address has been registered by Lifetime Analytics.
Select the data file from your local storage using the File button. Then, define or change the data file name. Name using "/" defines virtual directories into the application.
Launch the cluster discovery
While clicking on the Make Insights button, it allows to setup the cluster discovery processing task.
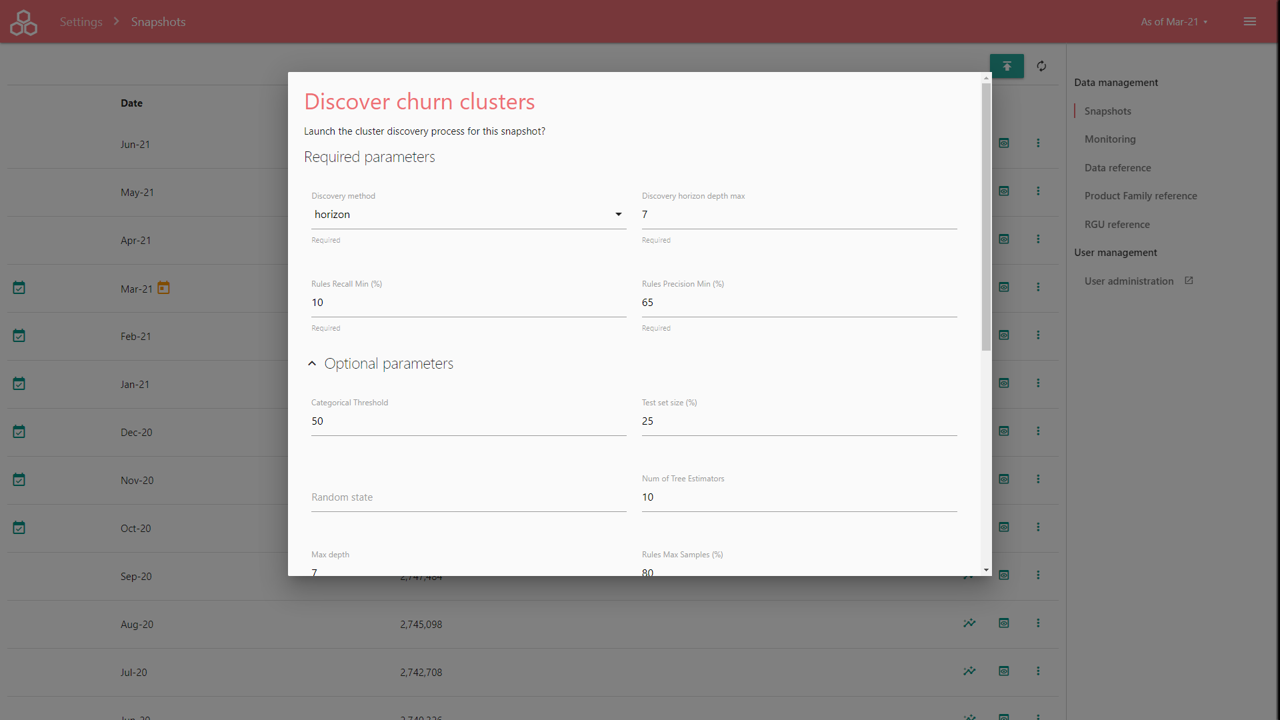
The parameters are configured by Lifetime Analytics during the setup phase. Advanced users can use different parameters to tune the Lifetime Analytics automated cluster discovery artificial intelligence.
Click on the Launch button to launch the processing tasks. See Monitor to display the state and progress of the task.
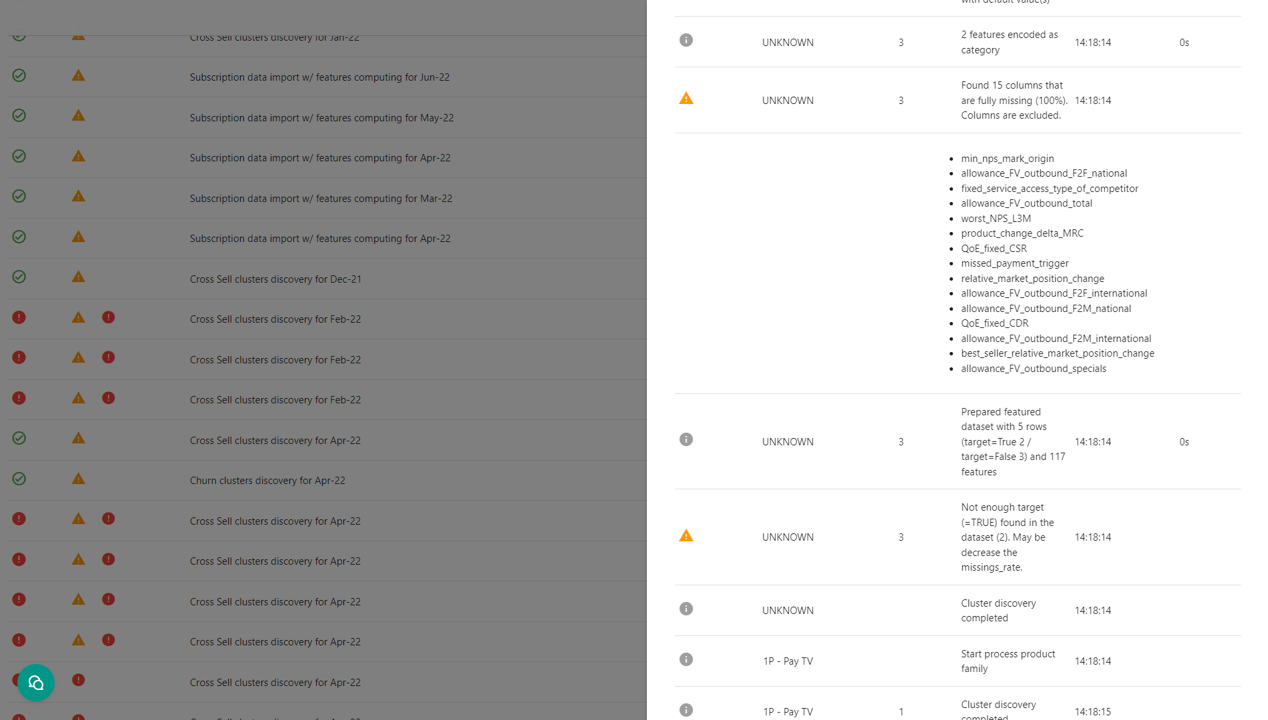
Monitor Import and Cluster discovery tasks
Importing Data files and Discovering clusters are long running tasks (30 min to many hours). The Data Management > Monitoring menu displays the list of tasks.
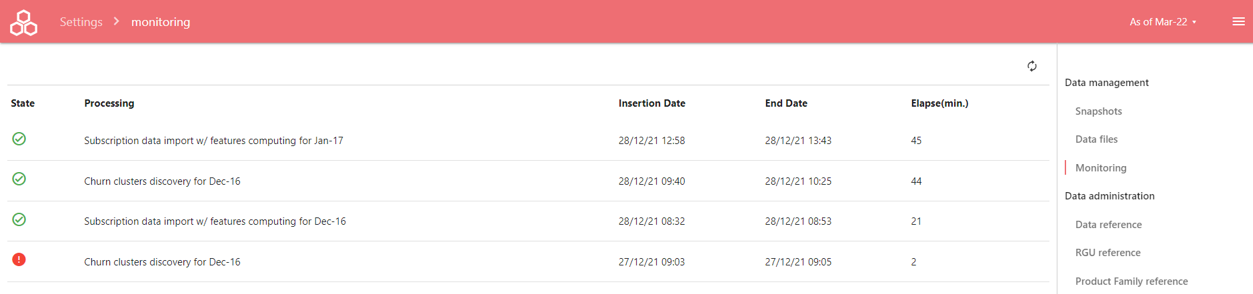
State : it defines the state of the task
Waiting : waiting to be processed
Pending : currently processed
Completed : processing done, with only warning eventually
Terminated with errors
While clicking on the task, it displays the task's parameters and step logs.